Neale Blackwood:
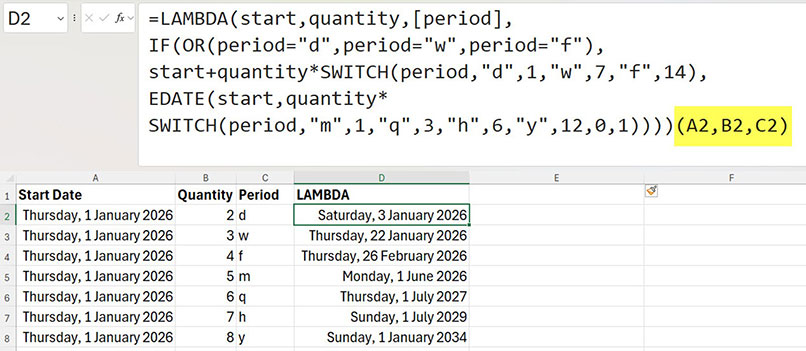
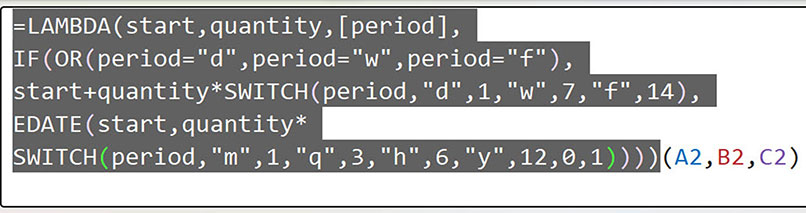
Welcome to "Excel Tips." My name is Neale Blackwood. And in this video we're gonna look at how we can simplify incrementing dates in Excel. Now, there's seven different main time periods that you wanna increment by in Excel. And each of them uses a slightly different formula. So, what we wanna do is create a single custom function that handles all seven of these time periods fairly easily, and we get a simple custom function out of it. To see the end result, here is the custom function in action. I use a prefix of FN for my custom functions.
This differentiates the custom functions from Excel's built-in functions. And we have a start date, a quantity, and then a time period. And the time period is optional. So, I'll show you how to set that up. And that single formula is doing all of the different time periods. So, we've got D for day, W for week, F for fortnight, M for month, Q for quarters, H for half years, and Y for years. So, each of those time periods is identified here.
The optional one was month, so if we don't use it, there is an EDATE function, which I will show you in a minute. So, this custom function only has two of the three arguments, 'cause the third argument was optional. And if it's left out, then it's using the M for month. Before we dive into how you build the custom function, I thought I would just show you these seven different calculations that we have to do to get our seven different time periods.
The easiest is the days. So, if you want to add two days to a date, you can simply select the start date, go + and add a number of days to it. And that will give you the adding two days to a date. This format, by the way, if you haven't used it, it's in this dropdown. It shows you, it's called the Long Date. It's got the whole day with the date and the whole month as well. So it does, I've used this format just so we can see that this is working as we'd expect it. Okay, so that's the easy one.
Then we come to a week. So, a week is just seven days. So, if you want to add three weeks, we just need to multiply 3 by 7. So, it's start date plus, and then we can put some brackets around it. We can multiply the 3 by the 7 and we can get the 22nd of January. So, that's three weeks added to our start date. Now, if you want the fortnight, obviously fortnights is the same idea, so I can copy this down, and then I just need to change that to 14. Okay, so they're the day-based calculations.
So days, weeks, and fortnights, there's a different factor that you need to multiply, and we'll look at that once we get to our custom function. Now, months. There is a built-in EDATE function in Excel. So, you specify the start date, comma, and then how many months to increment. And it's as simple as that. And that's the function that we're going to sort of hijack and use to create our custom function and use that to be able to handle all of these time periods instead of just the months. Okay. Ah, so I haven't formatted that one. So, I'll use the long format. We can copy this down as well. If you double click the fill handle there that we'll copy down.
Quarters, we need to multiply that by 3 to get the correct quarter. For half years, we need to multiply that by 6. And to work with years, we need to multiply that by 12. So, they're all using the EDATE function, but you need to apply a factor, either one. So, this one here is, obviously it's the number of months. This one here, we've multiplied it by 3 to work with quarters. This one we've multiplied by 6, and this one by 12. So, that's the idea. We're gonna be taking, doing a calculation. We're gonna use a factor to determine how many of the units to work with. It's either days or months that we're working with.
Okay, so let's have a look at the Lambda function that builds the custom function. To see all of the formula here, I'm gonna press a keyboard shortcut, Control + Shift + U. And that opens up the formula bar. It's a toggle, so if you press it again, it hides the formula bar. Okay, now I've also used a technique in this formula to put a line break in there. So to put a line break, it's Alt, hold the Alt key down, that's on the left of the space bar. Hold the Alt key down and press Enter. And that inserts a line break. And then, you can just delete to get rid of it.
Okay, so I find it's much easier to split the Lambda function like this so that you can understand the formula. Please note. This layout, this structure is only for testing the custom function. We're gonna use the Lambda formula as part of a range name, but this is not how you use the formula. This is something you need to test the formula. Okay, it looks a bit daunting, but let's work through it. You only create this once. So, even though this looks a bit scary, this is in the background of the formula. We saw earlier that the fnEDATE function is really easy to use because we've got all of this in the background. So, the user doesn't really see any of this. The user just uses the three inputs, but this is the setup for it.
Okay, so let's see how the Lambda function works. So, the Lambda function allows you to set up, in this case, three arguments into the Lambda. So the start, the start date, the quantity. So, how many. And we have a time period here that is in these square brackets. That's how you define what's called an optional argument. Now, it's pretty much best practise to always list your optional arguments at the end of your argument list. Okay, so the way we test this, and this is a special syntax just for the Lambda, when we're creating a custom function. On the end of the Lambda function, we have an extra set of parentheses or brackets, and these are the inputs.
We've got three inputs into these three arguments. So, A1 goes to start, B2 goes to quantity, and C2 goes to the period name. So, these names are then used throughout the rest of the formula. We're gonna do a calculation now. So, we're using the IF function. And we're gonna check if we are going to do a day-based calculation. So, day-based calculations is a simple plus to the start date, but we need to figure out the factor to use. So, we need to determine if the period equals a D or W or an F for day, week, or fortnight. If it does, so this is gonna return true or false.
So if it's true, it means it's a day-based calculation. So, we have the start date, and then we add the quantity. So, whatever quantity was passed to the formula. Now, this SWITCH function, so this is a fairly new function in Excel. It sort of is like a Lookup table. And it's like a built in Lookup table to your formula. So, normally you look up in an external table, but when you are working with a custom function, you need everything to be within the custom function. So the way the switch works, you have an entry. In this case, the period code.
Then after you've defined the thing you're looking at, you can then set up different values for each entry. So the D equals a 1, the W equals a 7, and the F equals a 14. So, they're our factors that we need to adjust our quantity by. And that's all built in. In the next switch we do need to pick up if there isn't a period. We'll see how we do that in a minute. Okay, so that calculation is returned if it's a day based calculation. Now if it's not, so now we're in the false section of this IF function. It's a month-based calculation. So, we use the EDATE function, and we have the start date, and we've got our quantity.
Now, the SWITCH function is gonna provide that factor again. So again, we have the period. M is a 1, Q for quarter is a 3, H is a 6, and Y is 12. Now, to handle the case, when the period is not returned, we can use the zero. So, zero and then 1 means that we default to using month. So, month is a 1 factor, we just multiply by 1. So, it is actually just a normal EDATE function. And that's it. So. that will then either perform a day-based calculation here or a month-based calculation there, and that's what's returned. So, we can click the tick. Now, to create the custom function, what you need to do is you test it.
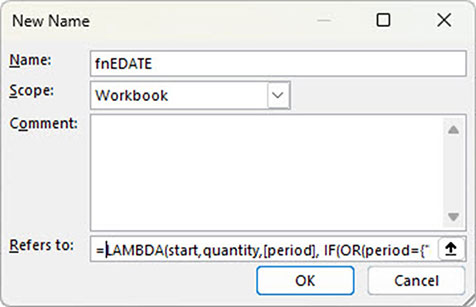
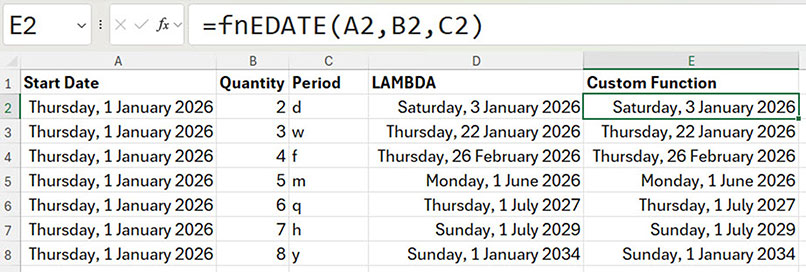
So, I've already tested it on this list. You copy that part of the formula. So, Control + C. To create the custom function, you go to Formulas, Define Name, and in this Refers to, that's where you paste your Lambda function. Now, you're gonna give it a name. So, I'll just say fnEDATE. I'll put a 2 on the end, so I know it's a different one. And that's it. So, that is now ready to use. So, I can click OK. And I can go in here and just show you that this one is working. So, fnEDATE2 is the one that I've just created. And we're gonna start with the start date, comma, We want a quantity, comma, and then the period is a day. And that's it. So, that's as simple as it is to use.
As I mentioned, it's a little bit complex in background, but then it's really easy to use this custom function there. So, we need to format that. Oh, now we use the Long Date. And double-click, copy down. So, these should all be the same. That's all looking good. So, custom functions allow you to capture the logic in the background. So, all of that logic is sort of, it's hidden to some extent from the user, that's why you do need to test it. But once you've created this custom function, you can use it throughout the file. You can also copy this sheet to another file and it will be ready to use in that other file.
Now, there is another thing that you might wanna do to help document your custom function. So, if we have a look at that fnEDATE, again. So, equals the second one. If I use that. Notice that it tells me I need a start, a quantity, and the square brackets around the period. So, oh, I better show you that it works with that month. So, there's the month. So, we should get the same result here if we use it. So, =fn, this is the second one. And we'll have the start date, comma, and 5. But that's it. We won't put the type of period in there and hit Enter. And again, we need to format it Long Date. And there we go. So, that's all Monday, the 1st of June, which is five months after the 1st of January.
Okay, so when you are building this, notice that you get the assistance here of the start date quantity and the period. Now, what they mean can be explained as well. So, let's have a look if I use the one that I've created earlier. So, this is the fnEDATE. Notice that there's a whole lot of explanation here. So, that's explaining to you what things are. So, increments a start date by periods, start equals the start date, quantity, number, and all of those are listed across there. As you are looking at this formula, you get all of that. If you click on this one, you don't get that. So, I'll show you how you can build this into your custom function.
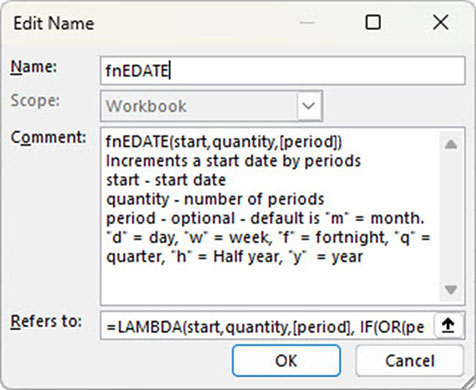
So, when we created the custom function name, that was under formulas, we used Define Name. If you click Name Manager, you can see the custom functions here. Now, if I open this one, double-click. This is, it's in the comments. So in this comment section, you can describe your custom function. So, I use this layout with the description of the function on the first line, then a description of what it does, and then a breakdown of the various arguments and how you can use them.
There is a limit to how much text you can put in here. So, just be aware. You can't go, you can't put too much in there. And that appears, as I mentioned, when you are building the function. And if you have one of those shown, it comes up with all that information to assist. So, basically with the second one we created here, this doesn't have anything. So, what you need to do is populate this with that. It does take a little bit of typing. Just note, to put a line break in this dialogue, you need to use Control + Enter, not Alt + Enter. And you need to use the Enter on the far end of a full size keyboard. So, just a heads up on that.
Okay, so that's how you can build a custom function to simplify incrementing dates in Excel. As I mentioned, it's a little bit complex in the background, but it's very simple once you've created it. So, you spend a little bit of time upfront. And so, then you can make it really easy to, in this case, increment dates using a custom function. These can be used for things like budgets, financial models, working out payrolls, which tend to be weekly or fortnightly, and also working with years, quarters, half years, et cetera. Hope you found that useful. Thanks for watching.