Loading component...
At a glance
You’ll also find out about counting non-blank cells, discover an easy way for lining up charts perfectly and find out about printing all the sheets in a file – or some of the sheets in a file – in one step.
1. Fixing VLOOKUP errors with TRIM
When your VLOOKUP function doesn’t work, the first thing you should check is whether there are extra spaces in the code in the table you are looking up.
When you import data from other systems it is common to have extra spaces added to some codes. This is called padding and can stop your VLOOKUP functions from working.
Trailing spaces are the hardest to spot. See Figure 1 for an example of the errors.

Cells A2, A3 and A4 all have extra spaces. The other three cells in the column are normal.
Luckily removing leading and trailing spaces from codes is easy using the TRIM function. An example of the TRIM function is =TRIM(A1).
The TRIM function removes leading and trailing spaces. It also removes any duplicated spaces within the text leaving just a single space.
If you are importing data using Power Query you can perform a TRIM operation on a column as a step in the Power Query. This automates the solution.
The typical solution for leading and trailing spaces in one column is to add another column to the table with the TRIM function linked to the problem column.
Copy the TRIM function down the column and then copy the new column and use Paste Special Values to paste the results of the TRIM column on top of the original column. You can then clear the added column. The results are shown in Figure 2.

2. How to count non-blank cells
When you review an Excel spreadsheet cells that appear blank are usually one of the following.
- Empty cells.
- Cells that appear empty because a formula returns “”.
- Cells that appear blank because a sheet setting has been changed that doesn’t display zeroes.
- Cells that appear blank because a format has been applied.
Figure 3 has examples of the first three.

We are only interested in the first two types.
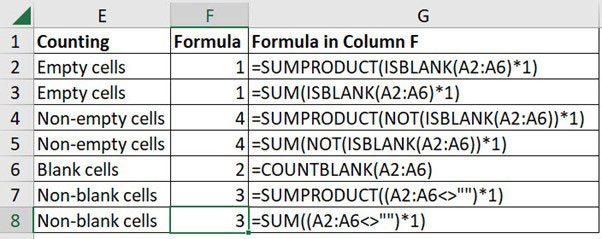
To count how many cells are empty in a range use one of the following formulas.
All Excel versions.
=SUMPRODUCT(ISBLANK(A2:A6)*1)
Excel Subscription version.
=SUM(ISBLANK(A2:A6)*1)
To count how many cells are not empty use.
All versions
=SUMPRODUCT(NOT(ISBLANK(A2:A6))*1)
Subscription version
=SUM(NOT(ISBLANK(A2:A6))*1)
To count blank cells (those that are empty or appear empty due to a formula) use.
=COUNTBLANK(A2:A6)
To count non-blank cells, those cells that do not appear blank use.
All versions
=SUMPRODUCT((A2:A6<>"")*1)
Subscription version
=SUM((A2:A6<>"")*1)
The formulas are summarised in Figure 4.

3. Lining up charts
When creating dashboards or reports it is common to line up the charts on the left and across the top.
You can do this manually, but there are two built-in ways to make it much easier.
Keyboard shortcut
You can use the underlying sheet gridlines to line up the charts. When moving a chart with the mouse, hold down the Alt key and you will see the chart “snaps to” the vertical and horizontal gridlines. This makes it easier to line up charts.
Ribbon option
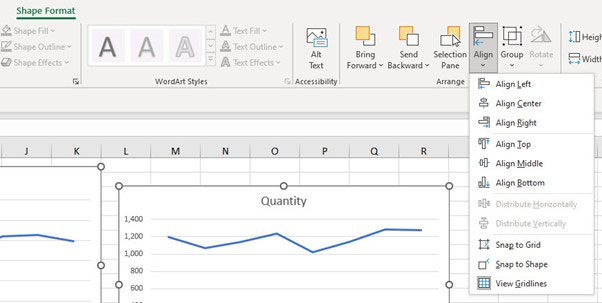
You can use the Ctrl key to select multiple charts at once. When more than one chart is selected a new ribbon tab is displayed. It is on the end of the ribbon tabs.
In recent Excel versions it is called Shape Format. See Figure 5. In older versions the tab is called Format.

You can use the various alignment options listed to line up the selected charts exactly as you want them.
4. Printing all the sheets in the file
This is easier than you might think but the technique does come with a warning. Be extremely careful using this technique.
Right click any sheet tab and choose Select All Sheets (last option) and then click the Print icon and all the sheets will be printed.
The warning is DO NOT LEAVE THE FILE LIKE THIS! You currently have all the sheets selected, make sure you right click one of the sheets and choose Ungroup Sheets (last option).
Things are now back to normal, all is OK and you can save the file.
Selecting multiple sheets
If you want to print more than sheet, but not all the sheets you can hold the Ctrl key down and use the mouse to select the sheets to print. Then click the Print icon.
Again, please make sure you use the right click and Ungroup the selected sheets before continuing and saving.
When you have more than one sheet selected and you edit any of the selected sheets you are in fact editing ALL the selected sheets at the same time. When sheets are identically structured this is a useful shortcut to change the structure across all the sheets.
The danger is you will forget that multiple sheets are selected and make changes that damage the file.
Be very careful with this technique and NEVER EVER save the file with multiple sheets selected because the next person who opens the file will not know the sheets are selected and this could cause major structural damage to the file.
There are very few visual warnings that multiple sheets are selected. In the title bar at the top of the window the word Group is displayed.
The colour of the selected sheets is also slightly different to normal. That’s not much of a visual indication to warn the user that multiple sheets are selected and you are editing more than sheet.

