Loading component...
At a glance
Mapping tables are commonly used to:
- convert one system to another system e.g. when changing general ledger systems
- combine data from separate systems
The first is a one-off procedure. The second can require ongoing maintenance, which is what I want to demonstrate.
Mapping tables need to include all the codes from one system to be mapped against codes from another system. New codes can present a problem because they may not have been mapped.
You can use formulas and filters to identify new codes, but using Power Query can be faster and more automated and scalable, especially for larger datasets.
Power Query is Excel’s (and Power BI’s) data import system. Both can bring separate datasets together and enable more useful reports.
Power Query can handle reasonably straightforward code differences, e.g. in one system, codes may be like ABCD-1234, and in another ABCD1234. It can also convert either code to work with the other, without needing a mapping table. I will demonstrate the technique in the companion video.
Mapping tables
Creating a mapping table may initially take effort, but is worth it. Maintaining mapping tables is often a manual process. It should be included as part of the process of adding new codes for the systems involved. I will use Power Query to identify new or missing codes.
Power Query
Power Query is built into Excel 2016 and later versions. It is a free add-in to Excel 2010 and Excel 2013. I have covered using Power Query to import single and multiple CSV files into Excel in previous articles – search Power Query on the INTHEBLACK website.
In this article I want to demonstrate how to use Merge in Power Query to identify missing codes, and how to use Merge to include a code from a mapping table.
Three tables
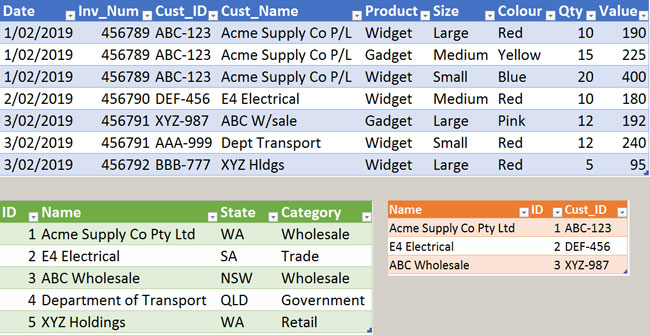
Our example includes three tables: a sales transactional table, a customer relationship management (CRM) table, and a mapping table. For demonstration purposes, all tables are small, but the technique scales well.
In Figure 1 the formatted tables are named tblSales (blue), tblCRM (green) and tblMapping (orange). I use a tbl prefix to differentiate table names from the range names I also use. Each table is in a separate sheet. I have covered formatted tables in previous articles.
In general, when working with datasets there are two types of tables:
- transactional tables – e.g. the sales table
- lookup tables where each row is based on a unique code; e.g. the CRM and mapping tables
Creating queries
To use a formatted table in Power Query you must create a query that refers to it. The process is the same for each of the three tables. I will start by creating a query for the sales table.
Click inside the sales table and then click the Data ribbon, then click the From Table/Range icon. This opens the Power Query window. The query name (right-hand side) will be the same as the table name. Insert a “q” in front of the query name to differentiate it from the table name.

Normally, Power Query takes a source table and creates a new output table; however, in this case we don’t need one. Click on the Home ribbon and the Close & Load icon drop-down – see Figure 2.
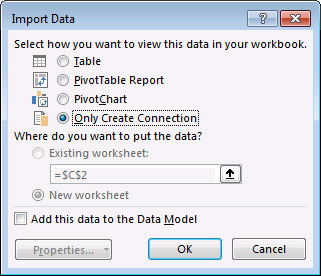
Choose Close & Load To and then select Only Create Connection as per Figure 3 and click OK.
This creates a query, but it doesn’t create an output table. We need to repeat the steps for the other two tables to create two more queries.
Missing codes
For the mapping table to work, all the Cust_ID codes in the sales table must be in the mapping table. To create a list of all the codes in the sales table that are not in the mapping table we can use a merge operation. In our example, there are two missing codes.
- The three query names should be listed on the right-hand side task pane. If they aren’t, click the Data ribbon tab and click the Queries & Connections icon to make the task pane visible. Right-click the qtblSales query in the task pane and choose Reference. This creates a new, separate query with the output of the qtblSales query as its input source.
- Rename the query to qtblSalesMissing.
- On the Home ribbon, click the Merge Queries icon.
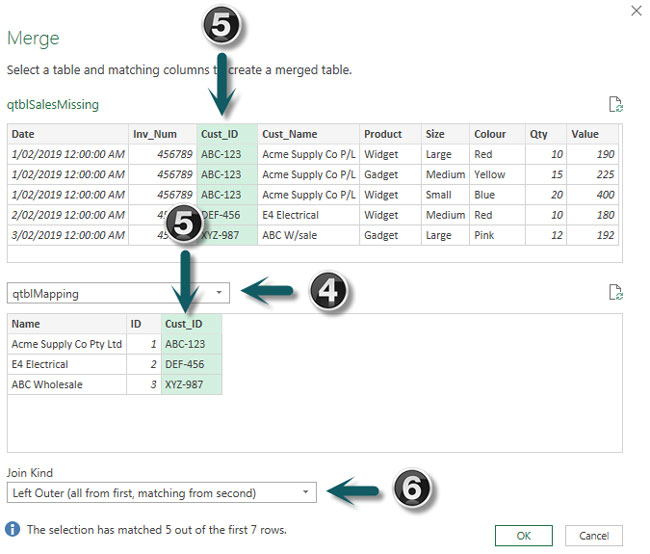
- From the drop-down in the middle of the Merge dialog choose qtblMapping. See Figure 4 for this and the following steps.
- Click each Cust_ID column in the top and bottom tables.
- From the Join Kind drop-down choose Left Anti (only rows in first). This type of merge will only list the codes that are in the top list (sales table) but not in the bottom list (mapping table). Click OK.
- Right-click the added column and choose Remove. Click the Close & Load icon.
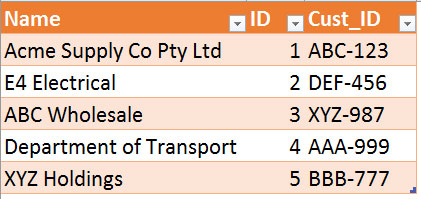
Once missing codes have been listed, they need to be added to the mapping table – Figure 5 has the two missing codes manually added.
Right-click the qtblSalesMissing query and choose Refresh and the table should be empty.
Once all the codes have been added, you can merge the qtblSales query and the qtblMapping query to include the ID column from the tblMapping table. This will then allow us to merge the tblCRM table with the tblSales table.
- Repeat step 1 from above and rename the query qtblSalesFinal.
- Repeat steps 3, 4 and 5 from above.
- Leave the Join Kind (drop-down option) as the default Left Outer and click OK.
- This will add a column on the right of the query table. The column header has a double arrow icon – click that.
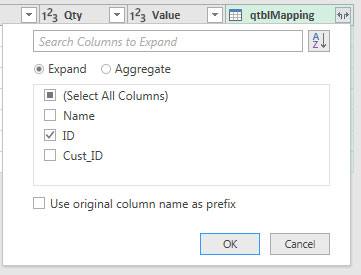
- Ensure only the ID field is ticked and the option at the bottom is unchecked – see Figure 6 – and click OK.
- This will add a column with the corresponding ID from the mapping table to the query table.
- Click the Close & Load icon to create a new table that includes the CRM ID in the sales data.
Adding fields
We could modify the second merge to include a further merge to add a column from the CRM table, e.g. category. That way, you could report on sales by category. Another method is to use the Relationships option in the Data ribbon. I covered the Relationships option in previous articles. Both techniques will be demonstrated in the companion video.
Merging tips
- Make sure the columns you use to merge are the same data type. You can click the column icon in the column header to change its data type.
- Watch out for leading and trailing spaces, which will affect merging. Power Query has a Trim option to fix these problematic spaces in columns. Right-click a column header and choose Transform and then choose Trim.
- Advanced users can merge based on multiple columns. Hold the Ctrl key down when clicking the columns in the Merge dialog. Make sure you select the matching columns from each table in sequence while holding down the Ctrl key.
The companion video and Excel files (example and complete) will go into more detail to demonstrate these techniques.
Neale Blackwood CPA runs A4 Accounting, providing Excel training, webinars and consulting services to organisations around Australia. Questions can be sent to [email protected].

