Loading component...
At a glance
You may be surprised how much time can be saved using shortcuts in Excel.
Some of the biggest productivity gains are with tasks that are performed frequently, because small savings add up during the day.
Although these tips are for Excel, many of them also work in Outlook, Word and PowerPoint.
The companion video demonstrates many of these techniques.
Select files and folders
There are two techniques to speed up selecting files and folders – quick access and pinning.

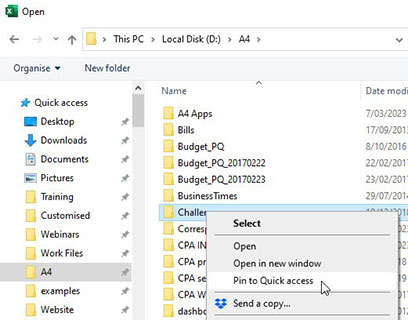
Quick access: In the Open dialog in Excel, right-click a folder and click Pin to Quick access. See Figure 1.
This adds the folder to a list on the left side of the Open and Save dialogs. This reduces the need to navigate through folders to access frequently used content.
Pinning: Click File to open Excel’s Recent list. Mouseover a file in the list. A small pin icon will appear on the right. Click this icon to “pin” the file to the top of the list. See Figure 2.

This will make the file always visible at the top of the Recent list.
In Figure 2, the Writing Schedule file has already been pinned because the pin icon is visible when it isn’t selected. When you select an unpinned file, the pin icon will display.
You can also unpin entries. You might pin a file/folder during a project and unpin it when the project finishes.
Customise the Quick Access Toolbar
The Quick Access Toolbar can be customised to show icons for your most frequently used features and options. See Figure 3.

The toolbar can be positioned above or below the ribbon. I prefer the toolbar below the ribbon as in Figure 2. Right-click the toolbar to change its position.
Right-click any icon on the ribbon to add it to the Quick Access Toolbar. Right-click on the Quick Access toolbar and click Customise the Ribbon to open the Options box and customise the toolbar by adding, removing and moving icons.
Full-size keyboard
If you use a laptop, I recommend using a full-size keyboard plus an external mouse. Laptop keyboards tend to have fewer keys than a standard keyboard.
The keys that tend to be removed on laptop keyboards are the numeric keypad on the right and the function keys across the top. Laptop function keys often don’t work unless a separate Fn key is pressed.
A full-size keyboard makes using Excel much easier.
The numeric keypad on the right (aka the accountant’s keypad) has a lot of advantages:
- Numeric keypad with a calculator layout rather than a phone layout
- Larger Enter and plus keys
- A dedicated * key, which is the multiplication symbol in Excel formulas
- The other formula operators / + - and the full stop key for decimals
These allows entry of the common mathematical operators used in Excel formulas without having to press the Shift key.
Keyboard shortcuts
Function key shortcuts can save time.
F4 has two separate shortcuts. When used in the Formula Bar it adds and moves the $ signs around cell and range references. Each press of the F4 key changes the position of the $ signs.

See Figure 4 for the sequence of changes.
When used outside the Formula Bar, the F4 key repeats the last action. This is useful for formatting and other tasks that require a few keystrokes to apply.
F9 is useful when troubleshooting formulas. Select part of a formula in the Formula Bar and press F9. This displays the result of the selected part of the formula.
The part of the formula selected must be able to be calculated in isolation, otherwise an error dialog will display.
F12 opens the Save As dialog to rename a file.
CTRL key shortcuts
The CTRL key has the most shortcuts by far. Here are some useful shortcuts that are not widely known.
CTRL + . moves the active cell to a corner of the selected range. This is useful to review the boundaries of large ranges. Hold down the CTRL and press the full stop when you have a large range already selected.
CTRL + [ follows a formula link in a cell. This will take you to the first cell/range reference in the formula. To return after following a link, press F5 and then Enter.
CTRL + ‘ duplicates the entry from the cell above. For formulas the cell/range references are identical to the formula from the cell above, no changes are made.
CTRL + ; enters today’s date as a data entry.

CTRL + S + W to close the current file – hold the CTRL key down and press S, then W to save and close the current file.
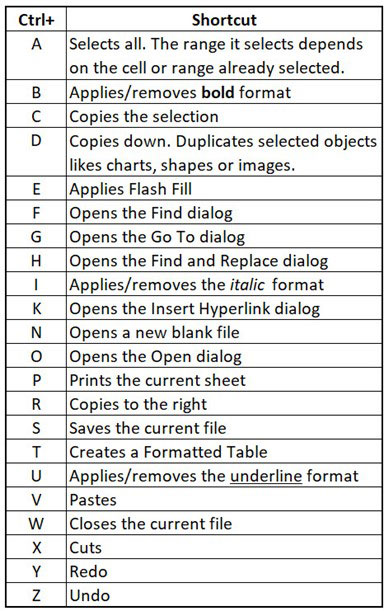
Figure 5 shows more CTRL key shortcuts.
ALT key shortcuts
The ALT key can be used like the CTRL key.
Some useful standard ALT key shortcuts are:
ALT + = inserts the SUM function. This works like the AutoSum ribbon icon.
ALT + ; selects visible cells only. This is useful for copying only the visible data when rows and /or columns are hidden.
ALT + F12 is a new shortcut key that opens the Power Query window.
Shift + ALT + right arrow applies row or column grouping. Grouping makes it easy to hide and unhide certain rows/columns by inserting icons to enable hiding/unhiding. Shift + ALT + left arrow removes grouping.
ALT key sequences
The ALT key also has another little-known feature that enables a different type of keyboard shortcut.
Access icons on the Ribbon and the Quick Access Toolbar using these special ALT keyboard shortcuts.
As an example, the first nine icons on the Quick Access Toolbar can be accessed using the ALT key followed by the numbers 1 to 9 – see Figure 6.

Instead of holding the keys down, press them in sequence.
For example, to apply the Wrap Text format press ALT H W in sequence.
Pressing the ALT key displays a series of letters and numbers at the top of the screen as per Figure 5. These represent the access keys for those options/icons.
More useful ALT key sequences include:
ALT W F F applies Freeze Panes to the active cell. It also removes Freeze Panes if it has been applied.
ALT A C removes all the filters from a filtered list.
ALT H V V pastes special values.
ALT A O opens the Queries & Connections Task Pane – used for Power Query.
ALT D L opens the Data Validation dialog.
Mouse techniques
Various mouse techniques can save time in Excel, including double-clicking, the fill handle and the right-click.
Double-clicking
Double-click:
- a sheet/tab name to modify its name
- The double-headed arrow cursor between columns to autofit the column
- The Format Painter icon in the Clipboard section of the Home ribbon to apply a format more than once, and press Esc to stop applying the format
- The arrows around the border of a cell to navigate around a table
- The Fill Handle (see Figure 5) to copy a cell down a list. See section below
The Fill Handle
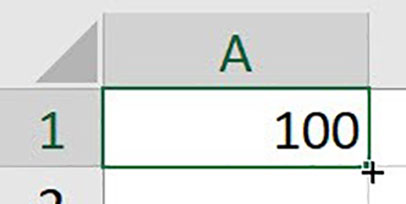
This small plus sign icon shows up at the bottom right corner of a selected cell or range. See Figure 7.

Click, hold and drag this icon with the mouse to either copy or increment as you drag.
To change whether you copy, or increment, hold the CTRL key down at the same time.
Double-click it to copy down.
Right-click
Right-clicking offers many shortcuts and productivity gains.
Right-click displays a specific menu for the selected item. Learn what is possible with the item through the menu items listed. Formatting items are consistent across many different right-click menus.
Right-clicking on the sheet tabs shows the tab colour options, while the sheet navigation buttons left of the first sheet tab show a list of all the sheets in the file.

