Loading component...
At a glance
In recent articles, I have covered some of Excel’s new functions. Did you know you can create your own spreadsheet functions?
There are times when what you are trying to do can only be achieved with a long and complex formula or multiple formulas, or a manual process. In these situations, you may want to try a User Defined Function (UDF), also called a custom function.
UDFs are written in Excel’s macro code language, Visual Basic for Applications (VBA). Excel has functions in VBA that would be useful if they were available as a spreadsheet function. We will look at three examples of how we can convert the VBA function into a worksheet function. To see some code examples (plus some bonus ones), click on the button at the top of this page.
UDF Rules
There are a few rules for UDFs.
- A UDF cannot affect the sheet in any way – for example, in changing formats
- A UDF needs to be saved in a Module in the file (I will explain this later)
- You must enable macros for UDFs to work
Worked example - user name
Let’s say you want to capture the user name of the person who has opened the file. VBA has a UserName function. This is a function that doesn’t have an argument, like the TODAY() function. Entries between the brackets of a function are referred to as arguments.

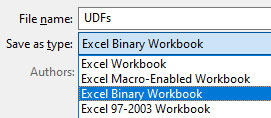
First you need to save the file you are using as either a macro-enabled file or a binary file type – see Figure 1. The standard Excel workbook does not allow macros. The shortcut for Save As is function key F12. This shortcut works in all Office applications. I have written about the binary file type before. You can read the article online here.
Press Alt + F11 to open a separate VBA window. We need to add a Module to hold our UDFs. A Module is a container for code, like a Word document that holds VBA code. You may notice that this window still uses the old menu and toolbar system. In the VBA window, click the Insert menu and choose Module.
In the new window that opens on the right, type the following code:
Function USER()
USER = Application.UserName
End Function

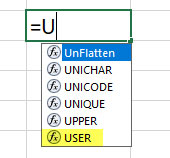
That’s it. You can now use the USER function on a worksheet in the file – see Figure 2. Note: if you type the function in lowercase initially, it will always display as lowercase. There is a workaround to fix this, covered in the companion video, which you can view by clicking on the button at the top of the page. Tip: don’t use the same name as the VBA function for the UDF – this will cause capitalisation issues in your VBA code. In this example, don’t use USERNAME for the UDF name.

When you start typing the function name, it will be listed like Excel’s built-in functions – see Figure 3.
Worked example - identify dates
We will now create an example that has an argument between the brackets. Have you ever wanted to know if a cell contains a valid date? Excel doesn’t have an ISDATE function, but VBA does. This is how to create an ISDATE worksheet function.
Function IS_DATE(rng) As Boolean
IS_DATE = IsDate(rng)
End Function

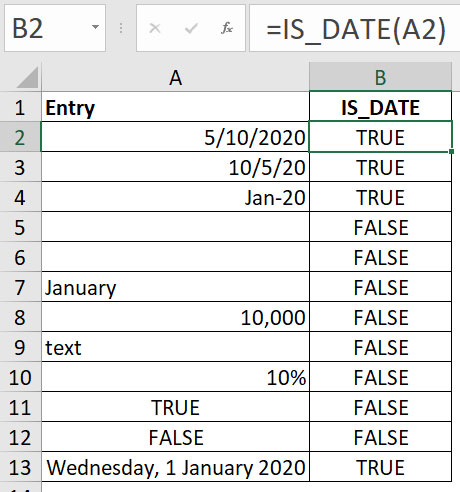
Adding “As Boolean” after the function means the output of the function will be either TRUE or FALSE. The IsDate VBA function returns TRUE if an entry is a date, or FALSE if it isn’t. You can see the new function in action in Figure 4. Cell B2 has been copied down.
Things to note in Figure 4: cell A5 is blank, but has been formatted as a date – it returns FALSE. Cell A6 is also blank, but has the General format applied. Cell A7 contains January, which is a month name, but it is not technically a date, and so it returns FALSE.
Worked example - splitting text
In this example, we take the VBA function and improve it to make it more flexible and useful.
If you want to split a text string, let’s say you have a code that has three sections separated by two dashes.
Those sections may represent categories or subcategories, and you want the ability to access the individual sections.
Excel VBA has a Split function. The problem is that it splits the entries into an array (a list). This makes it difficult to extract individual sections. We can tweak the VBA function to provide extra functionality.
We will create a function that uses three arguments.
- The cell to extract from
- The number of the section to extract, for example, “2” will extract the second section
- Optional – the character to use as the delimiter (the separator character). The delimiter will default to a space if omitted Figure 5 shows the function. The green lines are comments and don’t do anything.

The green lines help explain how the code works. Figure 5 is a screenshot from the VBA editor. I have added the blue and white numbers on the left of the image, next to the lines of code.
- The NEWSPLIT function accepts three arguments (inputs). The first two are required. The first argument “rngCell” is the cell to work on. The second argument “iPos” is the position number to extract. The third argument “strText” is the delimiter character – this is optional. If the delimiter character is omitted, a space is used. When building functions, always have any optional arguments listed last.
- The Dim statement defines a variable called varSting. The Variant type handles arrays (lists) – see point 03.
- We use the varSting variable to capture the output of the VBA Split function. The Split function splits text using a character and outputs a list of the entries as an array. As an example, the code 123-456-789 split with the – symbol would output as {123;456;789}. This is array syntax. Each element (part) of the array can be accessed separately via a number – see point 04.
- The last line sets the Function name equal to the element (section) number that we want to extract. We need to use the position number (iPos) less one, because arrays start their numbering from zero. The first element in an array is 0, and the second is 1.
I will expand on the workings of the array in the companion video, which includes some bonus functions.

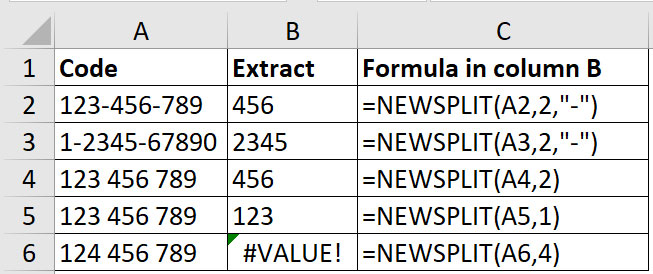
Examples of the NEWSPLIT function are shown in Figure 6.
The first two examples specify a delimiter character, while the next three don’t. The last example shows that if you refer to a position that doesn’t exist (position 4), the function returns an error.
Using UDFs more widely
UDFs need to be created in the file you want to use them in. If you want the ability to use these functions in all your files, you can create and install an Excel add-in that includes the functions. When the functions are included in an add-in, you don’t need to enable macros for the functions to work. Creating an Excel add-in is an advanced skill. Some
corporate systems may also prevent you from installing add-ins.
A note about Excel and dates
The standard Excel installation only recognises dates on, or after 1/1/1900. The IS_DATE function will recognise dates before 1900. The IS_DATE function is also more liberal in its identification of a date. Both standard date formats (dd/mm/yy and mm/dd/yy) are recognised as valid dates, no matter what your regional system date settings are. Excel may not recognise the entry as a date, but the IS_DATE function can still return TRUE. This means if you are trying to identify a valid Excel date, you will need to combine a few functions as below.
=AND(IS_DATE(A2),ISNUMBER(A2))
The companion video and Excel file will go into more detail to demonstrate these techniques.
Neale Blackwood CPA runs A4 Accounting, providing Excel training, webinars and consulting. Questions can be sent to [email protected]

